Cross kitting two Revell Piper Cub kits to build a L-21B
![]() ENGLISH TEXT
ENGLISH TEXT
Plane of the Popsey Black team 300 sqn RNeth AF 
Some years ago I had a subscription of the magazine “Onze Luchtmacht” (our Air Force) of the Dutch Air Force association. In this magazine there is a section dedicated to scale modelling. In this issue the writer Henk Blouw build a very colourful Piper Super Cub. Camouflaged but with yellow strips and engine cowlings. In the article he wrote that this machine was part of the Popsey Black demonstration team of 300 Squadron of the Roytal Netherlands Air Force. Henk used the Revell PA-18 kit. In this colour scheme the team flew their demonstration at the 60th anniversary of the Dutch Air Force in 1973 at the airshow at Deelen air base. The team flew also in 1974 at the Twenthe air show but the aircraft where repainted in their normal colours that year. The pilots of the team where: Lt Brobbel, Lt Huizinga, Lt Van der Hum and Lt Van Niekerk
It was a nice idea but I lost the interest in the project because their where enough kits on the workbench. But when Luuk Boerman of Dutch Decal announced the new decal sheet DD 32010 with decals for Dutch BO-105’s and Piper Super Cubs with the Popsey Black scheme my interest started again. So I did some research which version of the Super Cub the team used.
It was the L-21B version and this type can not be build out of the PA-18 Revell kit. The PA-18 is the civilian version of the L-18C.
So what are the differences between the L-18C and the L-21B?
The L-18C has an 95 hp Continental engine, small stabilizers and has no flaps. The Dutch registrations ranged between R-30 and R-88
The L-21B had an 135 hp Lycoming O-290 D2 engine, enlarged stabilizers and flaps. The registrations ranged between R-101 and R-186. When you see Dutch Piper Super Cubs with registrations between R-201 and R-217 these are the L-21A versions.
Revell issued nice kits of the Pipercub in 1/32.... 
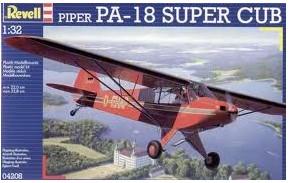
Revell came in 1/32 scale with a PA-18 but also with also a PA-18-150 kit on floats and there were all the parts you need to build the L-21B. I spoke with Peter Booij and my brother Joop about this idea but was not planning to do this in the foreseeable future. But at our IPMS meeting the Start on the last Saturday in august 2009 both guys came to me with two Revell kits of both versions of the Revell Piper Super Cubs. And they told me “that idea of cross kitting these two kits is a nice idea, do it and write about it in our IPMS magazine MIP”. Thanks guys.
So then came the job which parts from which kit to use to build the L-21B.
From the Revell PA-18 kit the fuselage, the wheels and undercarriage and the oil cooler from the engine.
And the other kit gave the wings, stabilizer, engine and engine covers and the front engine cover.
The seats, sticks pedals can be used from either kit.
Do not throw the other parts away, there is still a nice model of a Piper Super Cub on floats which you can build.
So let’s start to build the L-21B. For this stage I used the instructions of the PA-18 kit.
I started to scratch build the instrument panel from a piece of card. I used a picture of a L-21B panel out of a magazine. The decals of the kit where used to fill the instruments.
Then I airbrushed the inside panels with Humbrol matt 120. In the kit the seatbelts are moulded on the seats but I sanded them of and replaced them with home made belts from thin lead strips and copper wire. The seats where painted a dark brown leather colour and where dry brushed to get a more used look.
On the deck behind the second seat the Dutch Pipers where fitted with a radio, a first aid kit and a fire extinguisher. The radio came from the scrap box as was the first aid bag. The fire extinguisher was made from a piece of sprue and small strips of card. The electrical lines where made from thin solder and copper wire. When the cockpit was finished everything was a little dry brushed to get “used” look. After this all the clear parts fitted and masked with masking tape to prevent damage to the clear parts and it is more easy to apply in this stage of the build. The door and the moving clear part where fixed with crystal clear so they could be removed when the model was finished. 

Then it was time to use the building instructions of the PA-18-150 kit to build the engine. But do not forget to use the other oil cooler from the PA-18 kit. The engine block was painted dark grey and the cylinders matt black. After this the engine was dry brushed with silver paint. The firewall was painted with Humbrol matt 120 and weathered with some white, dark grey and silver
After this it was time to fit the engine which is a tedious job because you have to fit both the engine mounts and the engine at almost the same time to get everything aligned and straight. After this the cowling was fitted, with one panel left of because this will be placed in a manner to show the engine.
The wings came from the PA-18-150 kit, because these where fitted with the flaps. When you build the wings straight from the box the flaps are in the “up” position but when I checked photo’s of L-21B’s parked the flaps where somewhat in a “down” position. This is not difficult to achieve, you have to carve with a knife or a P-cutter the flaps so you can bent them a little. Than glue the wings together and let them dry overnight. Than attach parts 18 and 19 on their respective side on the bent down flaps. And their you are wings of a Super Cub with the flaps down.
The wings fit nice to the fuselage but you need just a little putty to close the seams.
After this it is time to change instructions again to attach the undercarriage.
The L-21B Super Cub was waiting to get a coat of paint. And then trouble started. The instructions of Dutch Decal just stated that the colours where brown and green. So what I did was paint on a piece of plastic card al the brown and green colours. I went to the Dutch Air Force museum because there should be a camouflaged Piper Cub but the museum just changed the collection and the Piper was put into storage. But luckily a few weeks later at the museum Aviodrome at Lelystad airport there was a fly-in where also some Piper Cubs came from the Air Force Historical Flight. I jumped in the car and went to Lelystad with my trusty piece of plastic card. After a good look I found the best matching colours were:
Testors French khaki for the green
Xtracolor X 617 Czech MiG Tan for the brown.
The yellow colour on the cowlings was a mix to get the same colour as the provided yellow stripes of the decalset.
The camouflage scheme and the yellow colour was sprayed on with my Badger 150 airbrush. When the paint was dry I sprayed the model with a high gloss Glitsa floor lacquer.
This was left to dry and I went on a 14 day trip on a naval ship to earn the money. When I got home the decals were apllied and went on really well. Sometimes the decals of Dutch Decal will not fit the model but this set is spot on. When all the decals where placed and dry, the model got a coat of semi matt Glitsa to protect the decals. All the masking tape was carefully removed. Finally I set the door and moving clear part in the open position so the cockpit could be seen, the engine cover was attached and all the small handholds and steps where fitted.
Those last parts finished the model and it could be placed in the display cabinet.
A very nice model of the L-21B of the Popsey Black team 300 sqn RNlAF
Build by: Henk Hirs
