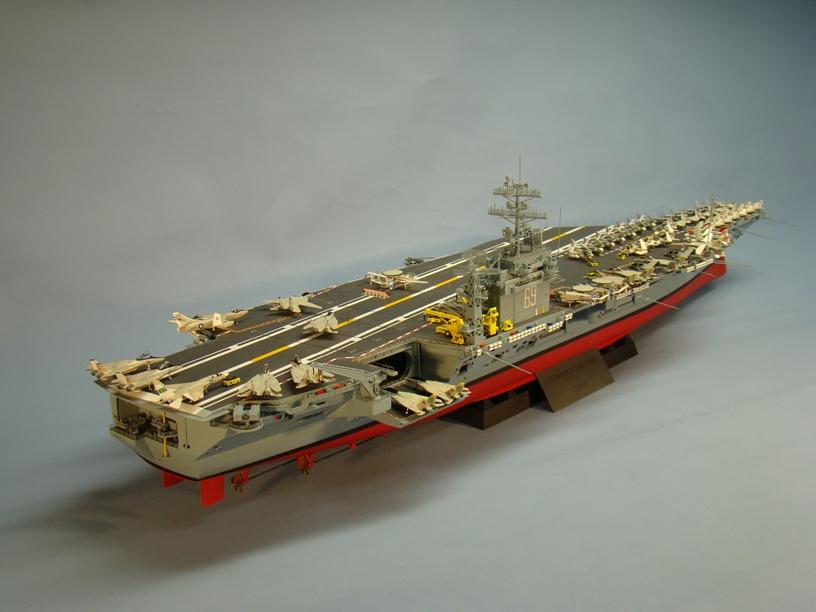
Modelling in 1/350 scale the USS Dwight D. Eisenhower (CVN-69)
Orginal article and model built by Walter Sonderman / Text translated by Axel Verheijen (lees Nederlandse tekst hier...)

The USS Dwight D. Eisenhower was the second aircraft carrier of the American Nimitz-class of ships. It was built at the Newport News Shipbuilding shipyard. The ship has been named after Dwight D. Eisenhower, the 34th president of the USA, who gained most of his fame as (highest ranking) general leading the US forces during the second World War.
The ship was commissioned in 1975 by Mamie Eisenhower, widow of the than already deceased ex-president, and was put into service two years later by the American Navy. The home port of the USS Dwight D. Eisenhower was Naval Station Norfolk. The ship was a direct replacement for the USS Franklin D. Roosevelt which had been in service for 32 years by then.
The ship carried several nicknames, which were:” I Like Ike”, “Ike”, “Ike'a'traz”, “The Mighty Dyke”.

Nimitz-class aircraft carriers
The Nimitz-class of aircraft carriers was designed at the end of the sixties when the Essex- and Midway-class of ships were approaching the end of their operational life and the Forrestal- and Kittyhawk class of ships were already several years in service.
The first nuclear-powered aircraft carrier, the USS Enterprise (CVN-65) had been in service since 1961 and was showcasing the advantages of this type of propulsion although the building costs were huge. The subsequent ships, the USS America and the USS John F. Kennedy, were equipped with a conventional propulsion layout.
The Nimitz-class had a much more efficient nuclear installation consisting of just 2 reactors instead of the 8 reactors that were needed on the USS Enterprise. This also had the added benefit of taking up less space so there was more space available for supplies and crew quarters. Where the Enterprise basically had a Battleship kind of design for the hull with four screws and four rudders, the hull of the Nimitz-class was shorter and wider with only two rudders. The propulsion of the Nimitz-class of ships was slightly less powerfull than that of the Enterprise (260,000 BHP compared to 280,000 BHP) and therefore had also a slightly lower topspeed. Which was still quite high with a maximum speed of 35 knots. Much to the frustration of accompanying ships which had trouble keeping up with these kind of speeds.
It is known that the USS Enterprise even reached speeds of up to 40 knots during trial runs.
The Nimitz-class consists of ten ships in total:
1- USS Nimitz (CVN-68)
2- USS Dwight D. Eisenhower (CVN-69)
3- USS Carl Vinson (CVN-70)
4- USS Theodore Roosevelt (CVN-71)
5- USS Abraham Lincoln (CVN-72)
6- USS George Washington (CVN-73)
7- USS John C. Stennis (CVN-74)
8- USS Harry S. Truman (CVN-75)
9- USS Ronald Reagan (CVN-76)
10- USS George H. W. Bush (CVN-77)
There are several constructional differences between the first three and final seven ships. That’s why these final seven ships are sometimes referred to as the Theodore Roosevelt-class, named after the fourth ship. Although the US Navy considers all ten ships as just one class, the Nimitz-class.
The USS Nimitz was put into service in 1975. The final ship of the Nimitz-class, the USS George H.W. Bush, in 2009. For this reason the equipment of the ships differs quite a lot. When older ships have to take in new nuclear fuel (fuel intakes can be several years apart) they will also be updated to the latest technologies.
This so called “Refuelling and Complex Overhaul (RCOH)” takes the better part of three years. But in between the operational periods (the duration of which is typically around 6 months) the ships are continuously updated which means that almost none of the ships from the Nimitz-class are identical.
The two nuclear reactors make sure that the ships can operate independently for several years on end. Eight steam turbine generators produce 8,000 kW of electrical energy each. Enough to power a small city of about 100,000 residents. The ships can carry supplies for up to 90 days. Four distillation boilers can make up to 1.5 million litres of potable water for catapults, drives and crew use daily. Additionally there’s also space for storing 11 million litres of jet fuel on the ship. The ship has equipment on board to perform repairs and there are more than enough weapons and ammunition present to defend the ship for a prolonged period of time. The ships of the Nimitz-class have furthermore all the services that can be found in a small town like a postal code, postal office, hairdressers, TV- and radio stations, intranet and internet servers, a mobile network, a newspaper, library, etc.
In 1998 the USS Nimitz took its first resupply of nuclear fuel, after more than 20 years of service. During the same time, the ship's systems were revised and upgraded to the latest specs. This process took 33 months. Next in line was the USS Dwight D. Eisenhower. Work on this ship was finished in 2005. At the end of 2005 the USS Carl Vinson was due for its overhaul and in September 2006 it was the USS Abraham Lincoln’s turn.
The USS George H.W. Bush has some bigger differences compared to the other ships from the Nimitz-class and as a result is considered a sub-class. The ship can be regarded as a transitional ship between the older Nimitz-class ships and the upcoming Gerald R. Ford-class (CVN-78). The ships of this class will have a higher efficiency and can be operated with a smaller crew. These ships will also have “stealth”-capabilities with a control tower which is positioned more to the rear of the ship. They will have 3 instead of 4 elevators and will feature electro-magnetic catapults instead of steam-driven catapults. In the meantime the keel for the second ship, named John F. Kennedy (CVN-79), has also been laid. The Ford class will also consist of 10 ships in total.
General features of the Nimitz-class of ships:
Maximum displacement: 104,000 long tons
Cost: 679 million USD (per ship)
Length: 333 m
Beam: - 40,8 m - 76,8 m (vliegdek)
Draft: 11,3 m
Propulsion: 2 nuclear reactors; 260,000 shp
Speed: 30+ knots
Crew - Ship: 3200, - Air: 2480
Armament: RIM-7 Sea Sparrow, RIM-116 RAM
Aircraft: 86 (but moslty 64 on board)
The TRUMPETER Kit in 1/350 scale.
In the summer of 2004 Trumpeter released a kit of the CVN-68 Nimitz. This kit allowed the modeller to build the ship as it was in it’s 1975 guise, right after it was put into service. At the time it was speculated that Trumpeter was also going to release a modernized version of the Nimitz. But sadly, that never happened.

The Eisenhower only differed slightly from the Nimitz when it was put into service, so it can also be built from this kit. Obvious visual differences are the absence of the catapult bridle catchers on the port side catapult track and on the angled catapult track and of course the different numbers on the deck and island. For the latter the appropriate decal set from Starfighter (350-14 Carrier Air Wing 7 1979) can be used.
It was decided to put some extra detail into the hangar bay because I wanted to build the Eisenhower as it appeared around 1980-1981. This meant that some additional modifications to the kit were necessary:
- The Nimitz was put into service outfitted with a Mk 25 Sea Sparrow launcher which is also supplied in the kit. This launcher was replaced by the Mk 29 in 1979. The Mk 29 launcher was already installed on the Eisenhower when it was put into service. So I had to build a Mk 29 launcher from scratch, although I could use the doors from the kit.
- The large rectangular AN/SPS-43A radar on the main mast had to be replaced by the AN/SPS-49 version. This was sourced from Gold Medal Models.
- A so-called ‘Belknap’ pole antenna had to be added.
- The same goes for the so-called ‘LSO-station’.
- The island had to be outfitted with extra antennas, extra floodlights on the bridge, additional supports for existing platforms and two additional platforms.
This kit of the aircraft carrier can easily be build in larger sub sections: the hull, the hangar deck, the flight deck, the island, the masts and finally the planes (air wing).
Hull and Hangar deck
As is usual with Trumpeter the hull consists of two halves separated at the waterline. This, combined with the length of the hull parts (95 cm), can pose some fitment problems. But I was able to put the parts together with only a small amount of filling and sanding. Trumpeter supplied some metal trusses to add to the hull to prevent deformation/warping. I suspect Trumpeter only supplied a hangar deck for this kit for additional stiffness. I was able to dry fit the flight deck only after I had added the hangar deck. Another reason that strengthens my suspicions is that according to the instructions you’re actually meant to glue the doors for the hangar lifts shut so you wouldn’t be able to see the hangar deck below anyway.
I finished off the hull first complete with all the platforms, walkways and handrails. At the same time I also embellished the UNREP-stations (UNderway REPlenishment, used for resupplying the ship at sea) with some extra detail.
My intention was to build a close to complete hangar and to pose the lift doors open. Using evergreen sheet I constructed the wall and fire doors between the hangars (there are three of those in total). As I didn’t intend to build lighting into this kit, I could keep the amount of detail at a reasonable amount. I only built some columns and platforms for which I also used a selection of evergreen sheet and profiles. I also added the three prominent “Conflag”-stations because they can be seen clearly through the open lift doors. “Conflag” is an abbreviation of the word “conflagration”. The “Conflag”-station is the fire fighting centre of the hangar deck. Furthermore I added some piping and conduits to give it all a busy look.
When looking through the open lift doors not only the outside wall (hull) is visible but also the inside wall, which is the actual hanger wall. I used parts A7 (2x), A13 and A14 (doors) to depict the inside wall simply by removing the door sections and glue the parts onto the hangar deck approx. 0.5 cm from the hull. The space between the hull and hangar wall was filled with Evergreen plastic. In reality the hangar is a big rectangular box, therefore I used Evergreen sheet for the ceiling to make the kit hangar rectangular.
I continued building according to the instructions without any specific problems. The stern platform and the three Sea Sparrow launch platforms were detailed with handrails. For the handrails I prefer to use set 350-12 “Modern USN Warship” from Gold Medal Models.
The hull was painted with Tamiya “Dark Ghost Grey” (AS-25), the hangar deck received “Gunship Grey” (TS-48). The decks have been painted with Xtracolor “Gunship Grey” (FS16118). The hull features several grids for which I used a black wash to make them more visible. Below the waterline I used Humbrol “Gloss Red” (19), along the waterline I used Humbrol “Gloss Black” (21) to make sure the decals would adhere better to the hull. After applying the decal with the ship's name (which strangely missed the ‘s’ in Eisenhower) to the stern of the ship I gave the ship a coat of Testors Dullcote. The hangar walls have been painted Tamiya “Matt White” (TS-27). Before mounting the flight deck to the hull it is necessary to add the planes, tractors and personnel to the hangars. I chose a dynamic setting: visible through the hangar openings work is being carried out on an A-6 and an A-7. The latter is getting an engine change with the tail section removed and the jet exhaust visible.
Flight deck
The flight deck is split into three large parts. The instructions have you mount the antennas to the deck sides before mounting the flight deck to the hull which might not be the smartest thing to do. I chose to add the antennas at the end of the build.
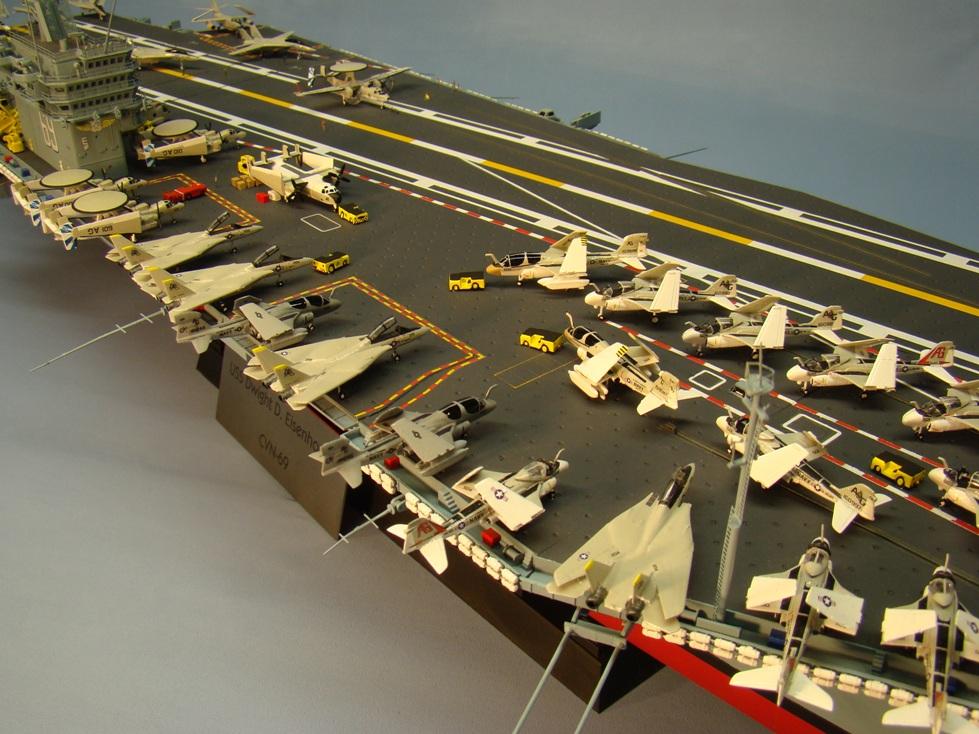
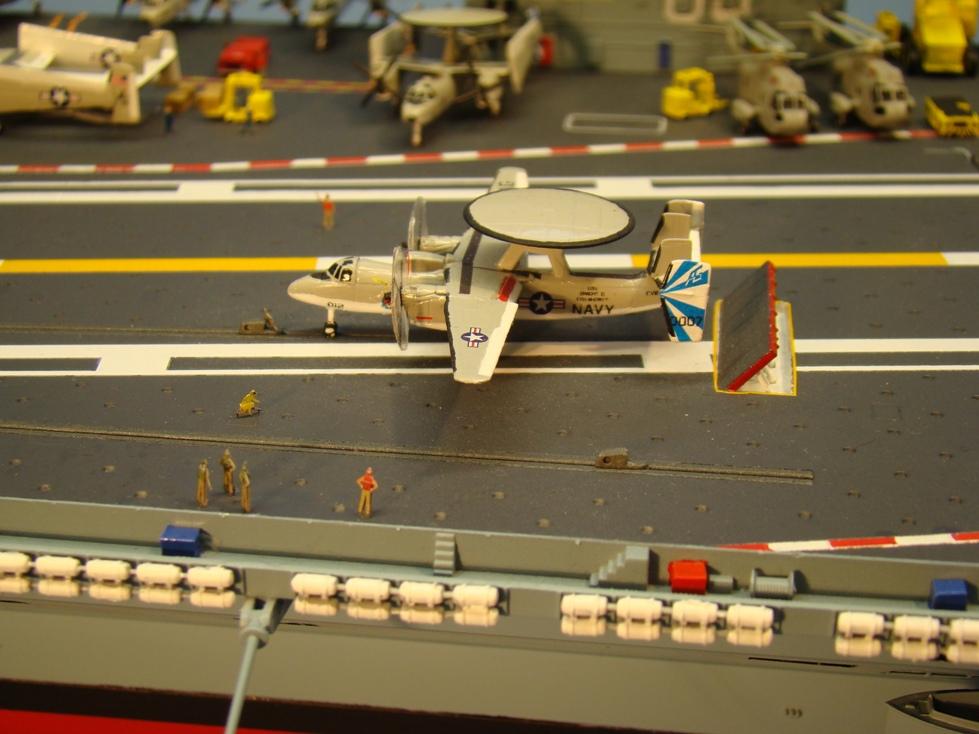
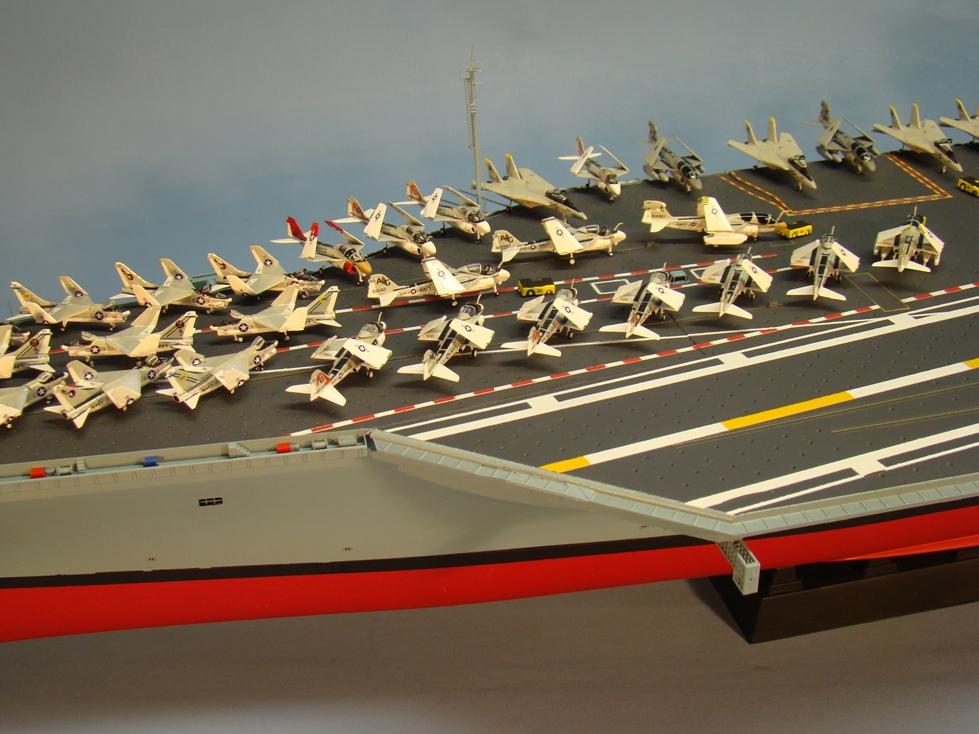
In this phase it is important to decide on the desired setup for the planes on the flight deck. I chose the so-called “Alert Five” setup. This setup is normally used when the ship is performing passive flight operations. Planes are grouped on the bow and a large part of the deck but the “Alert Five” Combat Air Patrol (CAP), existing of an F-14 Tomcat, the E-2C’s, the tankers and the helicopters, can be launched from the port side catapult tracks. That’s why I displayed one of the Jet Blast Deflectors (JBD) in the upright position.
The fit of the parts making up the deck is acceptable, in any case a lot better than with the kit of the Enterprise I built earlier. Still it was necessary to use some filler. It also turned out that I had to remove part of platform C6 to get the deck to fit to the hull.
The location point of the main mast on the deck is incorrect and needs to be sanded down. In reality the mast is fitted at the edge of the deck, instead of the location indicated by Trumpeter.
I chose to keep the catwalks and nets from the kit. Gold Medal Models and White Ensign Models provide photo etched replacements. The nets will surely look better in PE, but Trumpeter did a good job on the plastic versions so I’ll be using these. For the USS Eisenhower the port catapult bridle catchers need to be removed and the nets need to be changed. The LSO platform (Landing Signal Officer) has been built from plastic sheet and PE parts from the spares box. The catwalks were enhanced with additional red cabinets housing fire fighting equipment and blue cabinets for housing other equipment as the detail on the catwalks was rather sparse otherwise.
The flight deck was sprayed Tamiya “Gunship grey” (TS-48) and the catwalks received a coat of Tamiya “Dark Ghost Grey” (AS-25) before work begun on the lines that adorn the flight deck. The decal sheet that accompanies the kit has almost all the lines on it as a decal, but strangely enough the red-white “foul lines” are missing here. So they will have to be painted by hand. The deck numbers for the USS Eisenhower were sourced from Starfighter decal set 350-14. After the decals had been added the finished deck received a coat of Testors Dullcote.
After the flight deck was installed to the hull the scratch built Sea Sparrow launchers were added.
Island and masts
The island on an aircraft carrier is quite an imposing structure. It draws attention, especially if there’s lots of detail to see. I built and painted the three levels of the island separately. After painting I created the windows with the aid of MicroScale Krystal Kleer. Next the island was constructed according to the instructions. Overall fitment was good. I added several extra antennas, extra flood lights on the bridge, additional supports for existing platforms and extra platforms to the island to give it a more accurate and busy look. Finally the railings were added to finish this step of the build.
Parts E38, E39 and E50 of the flat SPS-48 3-D radar from the kit were replaced with PE parts from Gold Medal Models detail set 350-12 (Modern USN Warship).
I also replaced parts F40 and F39 (the smaller SPS-6 radar) with the appropriate PE parts.
The same detail set also contains the SPS-49 air search radar which replaces the big rectangular SPS-43A radar on the main mast. I also added an additional platform to the main mast, along with extra supports for the platforms. On pictures of the ship it can clearly be seen that several cable bundles run along the main mast. I tried to emulate these bundles with tiny metal wires from a coaxial cable. As already mentioned in this article the mast was positioned near the edge of the deck and not as far inboard as Trumpeter indicates in the instructions.
After the island had been attached to the deck, the final details, like the antennas along the edges of the deck, could be added. The problem with these antennas was that their sprue attachment point was located in the middle, which made removing them from the sprue quite a challenge. I had to replace several antennas with scratch built ones.
The tow tractors and forklifts in the kit were useable. Which wasn’t the case with the flight deck crane (nicknamed “Tilley”). The one in the kit doesn’t even come close to the real crane or anything else used by the US Navy. I used a crane from the USS Wasp kit from Revell instead. Luckily Revell provides two cranes in that kit. You only need to source six wheels for the crane for it to be used for the Nimitz kit. The smaller flight deck crane from the Trumpeter kit on the other hand is correct. On both cranes the platforms were detailed with PE railings.
The tow tractors appear a bit short at first sight. Especially compared to the tow tractors operated on carriers nowadays. This is because the kit provides the original Hough MD-3 tow tractors. These tractors have been in use since the 50’s but underwent an SLEP (Service Life Extension Programme) in the 80’s. That’s when the tow tractors received a detachable unit at the back containing a starter-unit which at the same time could supply planes being towed with electricity (the so-called ‘huffer unit’). I rebuilt one of the tow tractors and added the unit to the back. In this case I build the unit for a fire fighting tow tractor (hence the red color on the accompanying picture).
Finally the so-called “Belknap-pole” was added. The “Belknap-pole” was added to aircraft carriers after the cruiser USS Belknap had a severe collision with the aircraft carrier USS John F. Kennedy on November 22nd 1975. As a result of the collision the aluminium superstructure of the USS Belknap caught fire. Six crewmen of the USS Belknap and one crewman of the USS John F. Kennedy were killed in this incident. It is believed that miscalculations regarding heading and speed of the aircraft carrier aboard the USS Belknap as a result of the confusing location of the navigation lights on the USS John F. Kennedy led to this tragedy. The “Belknap-pole” has a fixed position to the starboard, in line with the island and contains navigation lights, spotlights and sensors. I built the mast from plastic rod and sheet for the small platforms. I used PE for the anemometer and the ladder. Brave is the crewman who climbs this ladder to the top of the pole (which is 21 meters above deck level).

Airplanes
The “raison d’être” for any aircraft carrier is of course its complement of planes. Without these the ship just looks empty. That’s why I don’t understand that Trumpeter only supplies 22 planes in this kit. As a comparison : the Tamiya USS Enterprise kit comes with 40 planes. That’s why I bought some extra sets of planes from Trumpeter.
The kit comes with a set of planes as present on the USS Nimitz in 1975. This means that the set includes the F-4J Phantom, but doesn’t contain the F-14 Tomcat which went into service in the US Navy during 1975. During 1978 the USS Eisenhower received its complement of Tomcats and so I had to purchase the Trumpeter plane sets which contained 6 F-14 Tomcats each. Sadly, the F-14’s in these sets are a real disappointment. Fins and sensors are missing on the underside of the fuselage, detail on the upper side is mediocre to say the least. Later Trumpeter released a reworked and much better version of this set complete with drop tanks. Still I decided to press on with the original F-14’s as I had already completed one of the sets before the newer ones were available.
For the air wing I chose decal set ‘350-14’ from Starfighter depicting Air Wing 7 which was stationed on the USS Eisenhower from 1979 onwards. As already mentioned I was planning to show an “Alert Five” setup on the flight deck of my USS Eisenhower.
Apart from 12 F-14’s I also made 18 A-7E Corsairs, 12 A-6E Intruders, 2 S-3A Vikings, 4 E-2C Hawkeyes, 4 EA-6B Prowlers, 4 SH-3 Seakings, 1 EKA-3B Skywarrior, 1 RA-5C Vigilante and a C-2 Greyhound. That’s 59 in total, not including the 10 planes I finished earlier and which are already positioned inside the hangars.
Why so many planes on deck you might ask. Looking at pictures of US aircraft carriers one can notice that there are always a lot of planes crowding the flight deck. The US Navy introduced the concept of ‘deck parking’ during World War 2 which meant that the number of planes that could be carried was determined by how many planes could be parked on the deck. The hangars were mainly meant for maintenance and repairs. The US aircraft carriers relied on the protective force of their aircraft and escorting ships. The English Navy on the other hand had a different philosophy. The maximum amount of planes that could be carried was measured by the amount of planes that could be parked inside the hangars. Which made sense as the British aircraft carriers featured armoured flight decks. Something can be said for both philosophies (being born from different situations). Fact is, the American Essex class of carriers often had over 100 planes on board whereas the comparable British Illustrious class only carried 36 planes.
One of the Hawkeyes was built in start configuration, which means extended wings, extended flaps and engines running. To depict the running engines I replaced the kit propellers with discs of transparent plastic. With nearly dry black paint I created the illusion of turning propellers. On another Hawkeye I opened up the crew door. De C2 Greyhound is being loaded through the opened loading ramp at the rear. It’s little touches like this that create a convincing and living scene.
The EA-6B’s and the SH-3’s are, as is common with Trumpeter these past years, made of clear plastic. I don’t know who came up with this ‘brilliant’ idea, as this means that it’s almost impossible to see what you’re doing. On top of that it also means that it isn’t possible to show the planes with an open canopy like I’ve done with the F-14’s, A-7’s and A-6’s. Additionally there’s also the fact that clear plastic is more brittle than regular styrene which means that extra care is needed when removing the parts from their sprues. I was planning to open the starboard door of one of the SH-3’s. The door finally ended as a small heap of plastic dust, which meant I had to scratch build a new door. On the subject of the SH-3 it would seem that Trumpeter took the civil S-61 version as a base for the SH-3’s in this kit. This is noticeable on the starboard side of the SH-3 which features 3 windows in a row (without a window in the door) yet there should only be one window in the sliding door and just one window in the fuselage. The Prowlers on the other hand are very impressive and feature drop tanks and jammer pod under the wings.
Of the other planes in the kit the A-6E’s really stand out with great detail and even a refuelling probe in front of the cockpit.
The EKA-3B needs some extra work in the shape of adding a radar bulge and a refuelling probe to the port side of the fuselage. The kit part is actually depicting an A-3B bomber version. All planes would have looked better with drop tanks under their wings. But at this stage of the project my motivation was a bit wearing thin, so I decided to leave the planes as they were.
The Starfigher decals have a continuous carrier film so they have to be cut out very precisely. They’re very thin and delicate and separate quickly from the decal sheet, but with a good amount of patience the results can be really fantastic.
Assembling 69 planes is quite a drag. The planes consist of about 12 to 15 parts each and receive approximately 12 decals each. I decided to build 6 planes at a time which would take me about three weeks. Some good advice: try to build something else during that time too because after a few weeks you can’t stand these 1/350 planes anymore...
Final steps.
The positioning of the 59 planes on the flight deck is not to be taken lightly, just like in real life. A flight deck is one of the most dangerous places to work. You can be run over, get blown away, walk into a running propellor or get sucked into a jet intake. I studied many pictures to decide how and where I should position the planes before committing to glue.
Normally the US Navy places the attack aircrafts (A-6’s and A-7’s) near the bow (called the Four Row Area) whereas the fighters (F-14’s) were situated on the rearmost part of the flight deck (called Fightertown). The E-2C’s and helicopters were positioned near the island (the Hummer Hole, named after the noise made by the turbines). Finally the Prowlers and S-3 Vikings are spread across the flight deck, but were seldom to be found at the bow area.
After all the planes had been positioned it was time for the final task, adding the crew. For the crew I used Eduard PE sets 17-503 and 17-515 (Aircraft Carrier Figures) for a total of 320 crew members. Set 17-515 is a so-called 3D set, which means that each crew member consists of 2 halves which need to be glued together. Right, you might call that 3D, but that’s stretching it a bit in my opinion. The big advantage of these PE sets is that they come pre coloured in the right colours. Even the numbers for the plane-captains have been added.
By placing the figures in different poses and actually give them some purpose (each crew member was assigned a specific task) makes them appear less flat.
If you would like an additional challenge (or self-punishment if you like) you could add some real 3D crew members instead of the PE ones. L’Arsenal and Goffy offer resin crew members in 1/350. But you’ll have to paint them yourself...
Conclusion.
Just building the Trumpeter kit out of the box already gives you a very big and very impressive model which will look great next to a Tamiya Enterprise. Although the latter one will have more presence thanks to the larger island. Detail on this kit is sufficient but with nearly 1,000 parts this certainly is no weekend build or something for the less experienced modeller. One of the big drawbacks is that there are only 22 planes included which leaves the ship looking a bit ‘naked’.
The modeller who, like me, is suffering from a mild case of AMS (“Advanced Modellers Syndrome”) will definitely add more planes. The addition of PE railings will also boost the look of the model. Kits of aircraft carriers need some deck crew to convey a sense of scale and to liven things up a bit. Without a crew it’s just a ‘dead’ model.
If you’re going all out on this kit and aim for a ‘show stopper’ you’ll have to invest heavily into this kit (think about €120 for PE additions) on top of the kit price of €130. And that’s without the extra planes you might want to add.
Gold Medal Models has 2 detail sets on offer for this kit which include masts, nets, parts for the stern dock and lots of other details. With these sets it is also possible to build other ships from the Nimitz-class. You will have to do some additional scratch building though (ie. platforms for the Phalanx defence cannons, etc.). The island of the later ships from the Nimitz-class is actually completely different to the one in the kit and as of the USS Ronald Reagan the main mast has been merged with the island. The bow has also been altered just below the waterline to include an additional forward bulging section for a calmer wake pattern.
Now that I mention this, these changes are actually not too difficult to implement… Hmmm… maybe I should pay my GP a visit for undergoing an AMS-test...
Author and modeller: Walter Sonderman
Member of the SIG Warships IPMS Nederland.
The beautiful pictures accompanying this article were taken by my good friend Jos Visser (also SIG-coordinator).
Article translated by Axel Verheijen September 2017
References:
- Squadron Signal: Nimitz Class Aircraft Carriers On Deck
- Osprey: Nimitz-Class Aircraft Carriers
- Several sources on the internet
(the IPMS NL Magazines MIP 2013-1 and 2013-2 featured this detailed build report)
The content in Dutch was first published Summer 2004 on this IPMS NL website; translated by Axel Verheijen September 2017
(C) Text and Contents: strictly copyright IPMS NEDERLAND; no part may be re-used without written permission
